CNC Machining Tolerances Explained: Everything You Need to Know
Regardless of the product's intended use, CNC machining tolerances are important parameters when manufacturing a product. Today, most industrial and consumer products require consistency to meet manufacturing standards.

Therefore, product manufacturers rely on various types of CNC machine tools to achieve high precision in their manufacturing projects. However, since the dimensions of CNC machined parts deviate from theoretical values due to material type, processing technology, and design, it is necessary to understand the concept, types, standards of machining tolerances, and how to measure them.
This article discusses the concept, importance, types, standards of CNC machining tolerances, and the different terms for measuring CNC tolerances.
What are CNC machining tolerances?
CNC machining tolerance refers to the maximum deviation or range of variation allowed between the part size and the design size during the CNC machining process. It refers to the allowable error during the machining process and is used to ensure that the size and shape of the final part meet the design requirements.
Why are machining tolerances important?
All CNC machining and parts have some degree of inherent variation. Machining tolerances are important for the following reasons:
1. Ensure quality consistency:
Machining tolerances are set to ensure that every part produced is of consistent size and shape, ensuring product quality consistency.
2. Meet functional requirements:
The performance and functional requirements of many products have strict requirements on dimensional accuracy. By controlling machining tolerances, you can ensure that the part will function properly and meet the functional requirements for which it was designed.
3. Cost savings:
Reasonable setting of processing tolerances can reduce material waste and reduce processing costs. Excessive tolerances may result in the need for re-machining or increased scrap rates, thereby increasing production costs.
4. Improve efficiency:
The setting of machining tolerances can help manufacturers optimize the production process, reduce adjustment and inspection time, and thereby improve production efficiency.
What are the common types of common differences in CNC machining projects?
Manufacturers in various industries often machine CNC parts using different tolerances due to differences in machining processes and part geometries. We will discuss typical CNC tolerances.
1. Dimensional tolerance:
Refers to the maximum allowable deviation range between part size and design size.
2.Geometry tolerance:
Refers to the maximum allowable deviation range between the position and shape of each feature on the part (such as holes, bosses, etc.) and the design requirements.
3. Surface roughness:
Refers to the maximum roughness range allowed on the surface of a part, usually used for parts that require a certain surface finish and flatness.
4. Fit tolerance:
Refers to the maximum allowable deviation range of fitting dimensions between parts, used to ensure fitting accuracy and tightness during assembly.
What are the common CNC machining tolerance standards?
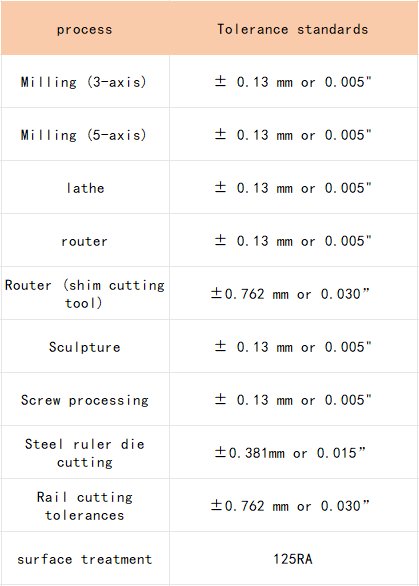
CNC machining covers a variety of processes with different tolerances due to different types of cutting tools. The following are standard tolerances for a typical CNC process:

What are the different terms for measuring CNC machining?
Different terms are associated with CNC tolerances, and understanding them can provide a better understanding of how to measure tolerances in machining. Here are typical terms you should know.
1.Basic size:
The base dimensions of a part are those specified in the drawing. Product engineers understand that manufacturing techniques often require a certain level of tolerance. Therefore, product designers use basic dimensions and pay attention to possible deviations during processing.
2. Actual size:
The actual size of the part refers to the size of the part after processing. Therefore, the actual dimensions represent the actual realization of the final product, while the basic dimensions represent its theoretical values.
However, product manufacturers strive to keep these two values in the same range, although making the actual dimensions the same as the basic dimensions is almost impossible to achieve.
3. Restrictions:
The limits are the minimum and maximum dimensions allowed for the part. The minimum allowed size is the "lower limit" and the maximum allowed size is the "upper limit". However, if these limits are exceeded, the part will be considered unavailable.
4. Benchmark:
Datum is a physical term that refers to an imaginary line or plane chosen arbitrarily as a reference point for a measuring tool. It is also common in the field of various geometric dimensions and tolerances.
5. Deviation:
Deviation is the difference between the maximum allowable size and the basic size. Since there are two types of allowable limits, there are two types of deviations in the results - lower deviations and upper deviations. However, it is easier to calculate these deviations:
Lower deviation = lower limit - basic size
Deviation upper limit = upper limit - basic size
CNC tolerances are at the heart of the machining process. These tolerances define the part's specifications, reducing turnaround time and tooling costs. Additionally, machining tolerances ensure greater consistency and proper performance of machined parts. However, it’s best to understand material selection, part design, and manufacturing processes to ensure your CNC parts meet preferred tolerances.


